Make this no knead bread recipe for a crispy crust and tender crumb. Minimal hands-on time and a long rise create big flavor with almost no effort.

Want to bake easy homemade bread? Try my very best no knead bread recipe! My parents have been making recipe since I published it years ago, and they have confirmed: this bread is truly life changing.
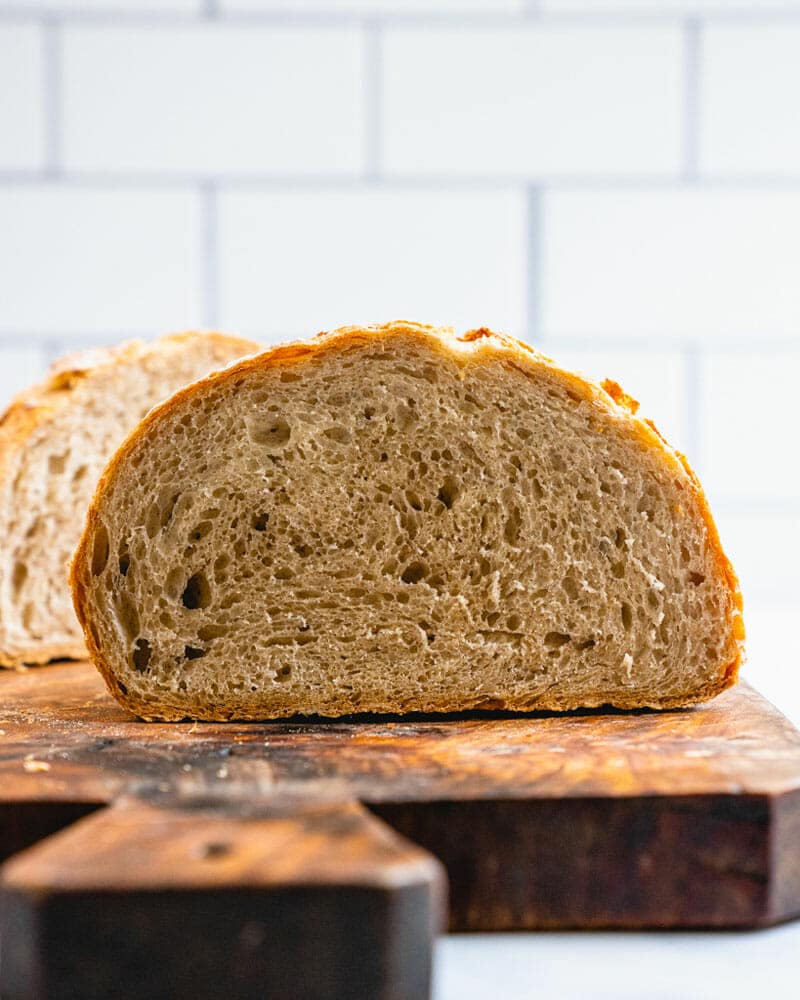
It’s got the best flavor: lightly tangy and robust. The exterior is the perfect crisp crust, and the interior has the perfect moist chewiness. If you’ve ever been intimidated by bread baking, this recipe will completely change your perspective. It requires minimal equipment, zero skill, and makes a loaf that tastes like it’s from a fancy bakery.
Why You’ll Love This No-Knead Bread Recipe
- Minimal hands-on time: It just requires 5 minutes to mix the dough and another 5 minutes to shape it: no kneading required!
- Beginner-friendly: No need for special skills or bread making experience!
- Bakery-quality results: It has a crispy, golden crust and an open, airy crumb like a professional artisan bread
- Simple ingredients: All you need are four basic ingredients you might already have in on-hand
- Impressive but easy: It looks and tastes like you spent hours on it, but it’s simple to make
What You’ll Need
Making no knead bread requires a few tools. It’s easiest to make with a Dutch oven, but you can also use a pizza stone. There are several optional tools as well that make things easier, but are not required. Here’s what you need!
- All-purpose flour and wheat flour: This forms the base of the dough and creates the perfect texture. Just a small amount of whole wheat flour adds nutty flavor and depth. I don’t recommend using substitutes here.
- Instant yeast, salt and water: The standard baking cast of characters.
- Apple cider vinegar: It adds a subtle tang, making that characteristic artisan bread flavor. White vinegar or lemon juice work in a pinch.
- Large Dutch oven or pizza stone with steam: This is a heavy cooking pot with a lid used for making soups and stews, and it’s ideal for getting a crispy crust when baking bread. I use this 6-quart cast iron Dutch oven. You can also use a pizza stone and add steam (see below).
- Large plastic bag: To cover the dough during rises. I reuse the same large plastic bag every time.
- Parchment paper: Makes transferring the bread to the hot Dutch oven easy.
- Lame or sharp knife: For scoring the bread. A lame is the traditional tool: I use this lame.
- Kitchen scale: The most accurate way to make bread is by weighing the flour. I use this kitchen scale for measuring.

How to Make No-Knead Bread: Overview
Here’s the basic outline of what you’re getting yourself into with no knead bread. The process takes 5 minutes the night before, and then about 2 hours the day of. Compared to my sourdough bread and artisan bread recipes, it’s the quickest and easiest bread recipe I have! Here’s an overview what to do (or jump to the recipe to get started):
- Mix the dough and rest overnight (5 minutes + 12 to 18 hours): The night before you want to bake the bread, combine all ingredients in a bowl. Cover the bowl with plastic and allow to rest at room temperature for 12 to 18 hours. The long fermentation allows gluten to develop naturally without kneading. After this rise, the dough should look bubbly and have doubled in size.
- Shape the dough (5 minutes): Flour a clean work surface and form a ball shape or boule. Watch this video tutorial for shaping the boule.
- Second rise (1 hour): Place the boule on a piece of parchment paper, cover with an inverted bowl and allow to rest for 1 hour at room temperature.
- Preheat the Dutch oven (30 minutes): About 30 minutes before you’re ready to bake, place your Dutch oven with its lid on into the oven and preheat to 475°F. This is what gives you the best oven spring (the final rise the bread gets in the oven) and crispy crust.
- Score the bread: Use a sharp knife, lame, or razor blade to make quickly make several shallow slashes across the top of the dough at a 45-degree angle.
- Bake (30 minutes): Bake for 16 minutes. Then wearing oven mitts, carefully take the bread out of the Dutch oven, place on the oven rack, reduce the temperature to 400°F, and bake for 25 to 27 minutes.
- Cool (45 minutes): This is the hardest part! The bread is still cooking as it cools, and the crumb structure needs this time to set properly.
Tips for Best Results
- Don’t add more flour during shaping: The dough will be sticky, and you might want to add more flour. Use just enough flour to prevent sticking. Too much flour during this stage will create a dense, heavy loaf!
- Adjust proof times as necessary: In a warm kitchen (over 75°F), the first rise might be done in 12 hours. In a cooler kitchen (65°F), it might take the full 18 hours or even a bit longer. Look for the bubbly, doubled appearance.
- Don’t skip preheating the Dutch oven: The blast of heat when the dough hits the pot is essential for the best rise and crust development (though I have had one reader tell me it still worked!).
- Listen for the hollow sound or measure temperature: When the bread is done, tapping the bottom should make a hollow sound. You can also measure the internal temperature with a food thermometer, which should be 205 to 207°F.
- Be gentle when shaping the bread: Gentle movements preserve the the air bubbles that developed during the proofing.
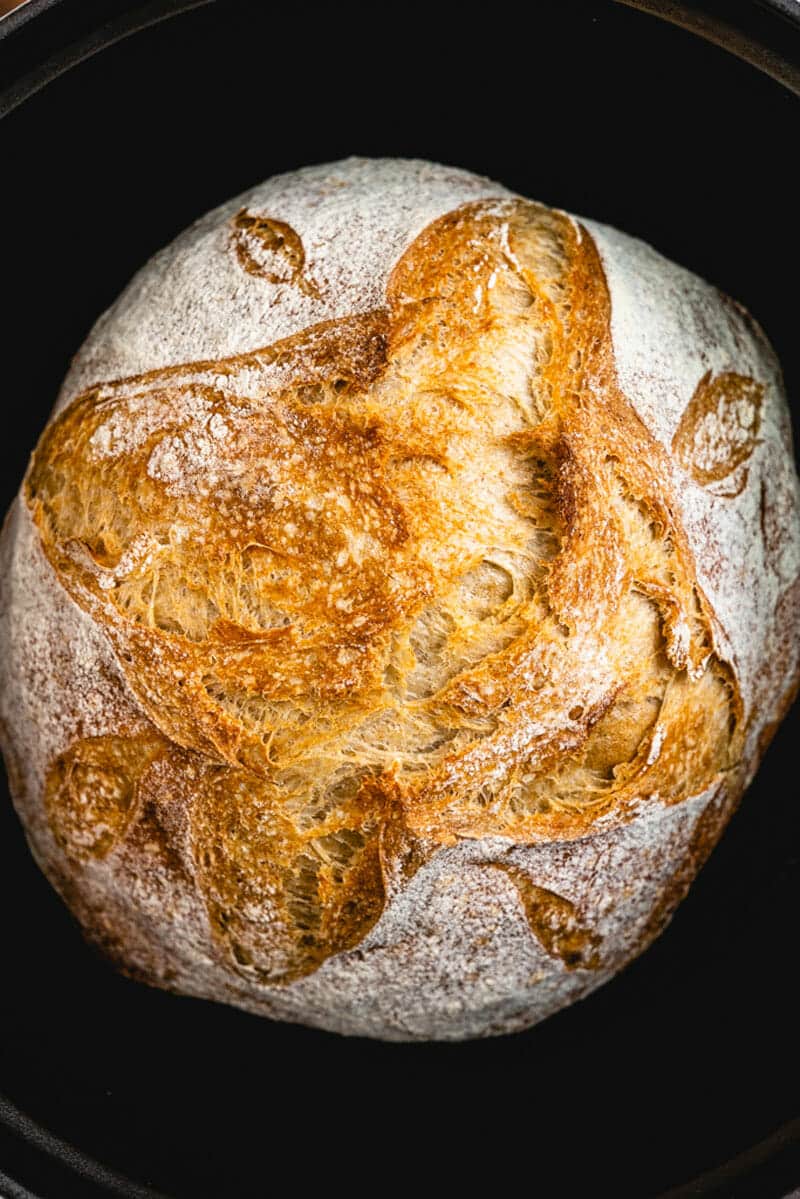
- Score the bread confidently: Make shallow cuts into the top of the dough. You want to cut just the surface — if it’s too deep it collapses, if it’s too shallow it bursts. Alex did this cross pattern for the bread scoring for these photos.
Variations & Add-Ins
- Without a Dutch oven: If you don’t have a Dutch oven, you can use a pizza stone (here’s the pizza stone I use). Place the pizza stone on the middle rack and a cast iron skillet or heavy baking sheet on the bottom rack, and preheat the oven to 475°F. Transfer the bread on parchment to the preheated pizza stone. Immediately pour 1 cup of boiling water carefully into the preheated skillet or baking sheet, then quickly close the oven door to trap the steam.
- Herb bread: When mixing the dough, add 2-3 tablespoons of chopped fresh rosemary, thyme, or sage.
- Olive bread: When mixing the dough, add 1 cup of chopped pitted olives (Kalamata, green, or a mix): see my Olive Bread recipe.
- Cheese Bread: When mixing the dough, add ½ cup of shredded sharp cheddar or Parmesan cheese.
- Seed-Crusted Bread: Before the second proof, brush the loaf with water and sprinkle on a mixture of sesame seeds, poppy seeds, or everything bagel seasoning.

Serving Ideas
This rustic no knead bread really is incredible! As I mentioned, my parents have made it every week for 6 years and it’s become a total family favorite. Here are a few ways to serve it:
- Serve as a quick side for your favorite soup recipes, like lentil soup or bean soup.
- Slices of this loaf make the perfect toast, like avocado toast or whipped ricotta and honey.
- Use it for next-level sandwiches like gourmet grilled cheese or a fried egg sandwich.
- Serve it with pasta like pasta puttanesca, or eggplant lasagna.
- Make it into garlic bread by brushing slices with garlic butter or compound butter

Storage Tips
This no knead bread has no preservatives, so the storage recommendations are different from a bread you might buy from the store. Here’s what to do:
- Room temperature storage (2 days): Once you’ve baked your homemade bread, it is best eaten within 48 hours. We store ours wrapped in cloth at room temperature. Use a clean dish towel or a bread bag.
- Frozen (3 months): Or, you can freeze it! It’s easy to cut your bread in half and freeze half of it! Let it cool to room temperature, then cut it into slices and place it into a sealed bag or container.
Dietary Notes
This no knead bread recipe is vegetarian, vegan, plant-based, and dairy free.
Frequently Asked Questions
Flat bread usually means the dough over-proofed (rose too long) or your oven wasn’t hot enough. Make sure to preheat your Dutch oven fully.
Dense texture typically comes from not enough rise time or adding too much flour during shaping.
Gummy inside means the bread was cut too soon: always let it cool for at least 45 minutes.
Pale crust means the baking time was too short.
The point of no-knead bread is to make artisan-quality bread easy to make by any home baker by taking out the work of kneading. Instead of working the dough by hand for 10 minutes, time does the work for you. The extended fermentation (12-18 hours) lets the gluten strands to form naturally through a process called autolysis, while the yeast slowly ferments the flour, creating complex flavors and that characteristic tangy taste. This method also fits easily into a busy schedule since most of the time is hands-off.
Most parchment paper is safe up to 420-450°F, which is why I recommend removing the bread from the Dutch oven after the initial 16-minute covered bake and placing it directly on the oven rack for the remaining time at 400°F.
This recipe is designed for a round boule baked in a Dutch oven. I recommend trying my Sandwich Bread Recipe for a loaf pan.
Best No Knead Bread Recipe

Make this no knead bread recipe for a crispy crust and tender crumb. Minimal hands-on time and a long rise create big flavor with almost no effort.
- Prep Time: 1 hour 30 minutes (including overnight)
- Cook Time: 40 minutes
- Total Time: 2 hours 10 minutes
- Yield: 12 to 14 slices
- Category: Bread
- Method: Baked
- Cuisine: Artisan
- Diet: Vegan
Ingredients
- 3 cups all purpose flour (375 grams)
- ½ cup whole wheat flour (62 grams)
- ½ teaspoon instant or active dry yeast
- 9 grams 1 ½ teaspoons kosher salt
- 1 ⅓ cups water (314 grams)
- 1 tablespoon apple cider vinegar (15 grams)
Instructions
- Mix the dough & rest overnight: In medium bowl, stir together the all purpose flour, whole wheat flour, yeast and salt. Add the warm water and vinegar and stir with a wooden spoon or dough whisk until all flour is incorporated. Place the bowl in a proofing bag or cover with plastic wrap. Rest at room temperature overnight (12 to 18 hours). The resulting dough will be bubbly and very sticky.
- Shape the dough: When ready to bake, remove the dough from the bowl onto a clean, lightly-floured countertop. Gently spread the dough into a square and then fold up each side into a packet. Flip the dough over. Place your hands behind the dough and gently pull the dough towards you to increase the tension on the surface of the dough. Rotate and repeat until you have a boule shape. Follow this video tutorial for boule shaping technique.
- Proof the dough for 1 hour: Place the boule on a piece of parchment paper about twice the width of the boule. Cover the dough with an inverted large bowl and rest one hour.
- Preheat the oven: Preheat the Dutch oven (with lid) at 475°F for 30 minutes. (Or for the pizza stone method, place the pizza stone on middle rack of oven, off to one side. Place a cast iron pan or thickest baking sheet on the rack just below and off to the other side of oven. You’ll pour water into it later to create steam.)
- Score the bread: Use a sharp knife or lame to cut several shallow slits at angle across the top of the dough. The photographs show this cross pattern.
- Bake for 16 minutes: Working quickly and carefully with oven gloves or mitts, transfer the dough on the parchment paper to the preheated Dutch oven, then place the top on. Bake for 16 minutes. (Or for the pizza stone method, transfer the dough on the parchment paper to the preheated pizza stone. After the bread is on the the stone, make the steam: cover your hand with a towel and very carefully pour 1 cup of water onto the cast-iron pan or baking sheet, then immediately close the door.
- Reduce to 400°F and bake for 25 to 27 minutes: After the 16 minutes, reduce the oven temperature to 400°F. Remove the Dutch oven, carefully take out the bread, and set the bread directly onto the oven rack. (Or for the pizza stone method, open the oven door a couple of times to fan out excess moist air.) Bake for an additional 25 to 27 minutes, until hollow when tapped or internal temperature is at 205 to 209 Fahrenheit. Remove the bread from the oven and allow it to cool on a cooling rack for at least 45 minutes. After cooling, the bread is ready to eat. Store the bread wrapped in cloth or in a bread bag on the counter for up to 2 days (do not store in plastic). Freeze (sliced) wrapped in foil in a plastic bag for several months.
Notes
Flour substitutions: You can use 100% all-purpose flour if you don’t have whole wheat.
Salt: I use Morton’s kosher salt or fine sea salt. If you use Diamond Crystal, you can increase slightly.
Without a Dutch oven: See the preheated pizza stone with steam method.
Storage: Store wrapped in cloth at room temperature for up to 2 days, or freeze sliced bread in a sealed bag for up to 3 months.
More Bread Recipes to Try
- Easy Homemade Bread
- Easy Whole Wheat Bread
- Artisan Dutch Oven Bread
- Focaccia Bread
- Baguette Recipe
- Homemade Bread Recipes Collection
from A Couple Cooks https://ift.tt/UvtdqFi
Comments
Post a Comment